We continue with our series of tips for Mass Effect 2 missions while playing on the Insanity difficulty setting. Today, I'm going to talk about the Horizon mission. You get this mission once you've recruited Mordin, Garrus, Grunt and Jack. Keep this in mind since once you get those four, you will be unable to go anywhere else. You are forced to speak to the Illusive Man and that will automatically send you to Horizon. It's important, since you might need to buy upgrades for your weapons before you reach Horizon. For example if you have three of the aforementioned crewmates, go buy upgrades if you need to before you get the fourth. However, you can't buy two of the assault weapons upgrades until you are finished with Horizon so you might want to save your money.
Horizon is one of the toughest missions on the Insanity difficulty setting. So remember my general tips for Insanity. You will face enemies with defensive Barriers and Husks with armor!, so as bring Miranda and I bring Zaeed. Remember that Zaeed's Concussive shot is effective against barriers and his Inferno Grenade is effective against armor with a splash effect that will damage nearby enemies. As with other posts for tips on Insanity, this article will cover only the more difficult parts of the mission.
1. Meet Harbinger. During the battle, the Reaper Harbinger will take over an enemy Collector. Once he does that, the possessed Collector will have a glowing molten effect. His defenses will be barriers and armor. Biotic attacks include setting you on fire, unknown damaging biotic attack and an attack that pushes you back from you cover. Harbinger also will advance on your position, i.e. doesn't seek cover.
Now the one attack that is the most dangerous is the "push" back attack. Why? Because when you're under cover it forces you out of cover and Harbinger's buddies or he kills you when you're in the open. So he is usually a priority unless there are husks. There is one weakness in the Push attack. It looks like a ball of energy and moves slowly. You can dodge it.
Here's another hint. Destroy as many Collectors as fast as possible so that Harbinger has less troops to possess.
2. Before the Bunker and Collector Particle Beam Weapon. Once you reach the Collector Particle Beam weapon, save your game. Now if you move too far forward, you get a cutscene where a bunch of Collectors come into battle.
First, get your team in cover. Sometimes they get too aggressive and move forward where they get killed easily. There's a wall past some trailer where you can post them. Or post them further back or run to the apartment above the lawn.
Second, you should stay in cover. Concentrate on Harbinger. Once he's down, nail the other troopers as fast as possible.
3. After the Bunker, the battle in Block 7. Okay, you reached the Bunker. Talk to the mechanic. Go to the ammo locker and resupply. Get the medi-gel and credits. Save your game.
Once you leave the Bunker, there's a small area where storage containers are to your left. To your right is a small wall. Beyond that are Collector infantry. They won't attack you right away unless you move too far into the block. Take this time to position your squad. You can put one behind the containers. Okay, time to engage. Unfortunately, there's no stealth attack but take out your sniper rifle and get as many head shots on the infantry as possible.
The battle is joined. It gets hairy from here. Husks come from across the yard. Harbinger possesses a Collector. Oh, there's also a Scion! Remember the rules. Take out the Husks first. Use Miranda's Warp and Zaeed's Inferno Grenade to destroy their armor. Speed is the key. Okay, by now Harbinger should be on top of you. Don't spare your assault weapon ammo. Unleash your assault rifle on him. By now Miranda and Zaeed should have recharged their powers. Unleash them on him. You may have to retreat behind the containers. Once Harbinger is down, attack the Scion. It's the slowest of the three charging enemies. Now note once the Collectors have been thinned. You might be able to make it to the apartment to your left, giving you the higher ground. Okay, you've cleared the area. Scavenge and save your game.
4. The Spaceport
a. First Attack. As you move into the spaceport, husks appear from the raised platform to your left so you can't get there right away. Two Scions also join the battle. I've read that once you enter the spaceport, you can move far to the left or right and take out the Scions with a sniper rifle. Once that allegedly happens the husks won't appear. I do not know if this is correct, because each time I went in the husks appeared quickly. Anyway, remember the rules. Take out the fastest charging enemies first. Those are the husks. Stay in cover. Once the husks are down, unload on the Scions. Move around if you have to. Okay, when it's clear collect ammo clips. Save your game.
b. Second Attack. Hack the control terminal. Now remember the raised platform on you left where the husks came from? Run there. It's raised, giving you higher ground. The wall on the platform gives you cover.
b.i. First Wave. Once there, Harbinger makes his appearance. Use your squadmates powers and a sniper rifle to weaken or destroy him. At this moment husks will run at you from the field. Nail these guys. Another group appears. Same as before. Whew. Take a quick breath.
b.ii. Second Wave. You hear the groans of husks. They're right behind you! Okay, use Miranda's Warp and Zaeed's Inferno Grenade on them. Slam any without shields. Remember one or two throws kills them. Do not use your shotgun. Sounds counter intuitive. But the assault weapon fires faster. If you have to move then move. But be aware that Harbinger and Collectors have been deployed from your right. But once you've killed the four husks behind you, the deck is clear. Look to your right.
If you're still on the platform, more Collectors and Harbinger will deploy once you've taken out the first. However, you have the high ground. Use your sniper rifle and slam. On this platform, there is medi-gel but remember to try to save as much of it as possible for the big boss fight later. After you've killed the first Harbinger in this wave, the other two reincarnations are easier to nail. Why? Because they spawn further back and take a long time to get to your position. By that time you've pretty much killed them. Okay, take out the rest of the bad guys. Once you've done that, the game takes to the boss fight.
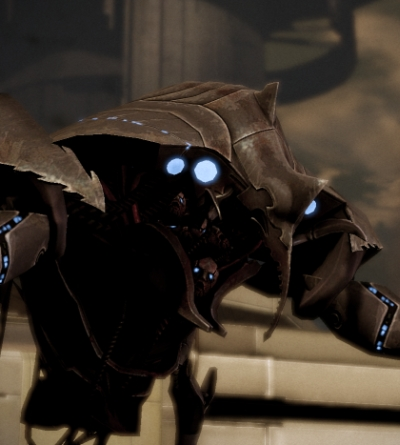
c. The Praetorian. This flying tank (pictured) has barriers and armor for defense. For weapons it has twin particle beams. It has a Death Choir attack where it slams to the ground, causing damage to anyone nearby. While on the ground it regenerates its barrier and cannot be damaged. Get hit by the particle beams will kill you in a few seconds.
This is the most important thing to remember when trying to defeat this thing. KEEP MOVING. Stay under cover but if the Praetorian flanks you, MOVE. Because it can fly, it doesn't have to move around you, it merely has to hover above you. Once it's about to get a clear shot at you, move and seek cover.
So if you're running all the time, how do you kill this thing? It's easier than you would think. The Praetorian is interested in one person. You. Take advantage of that. Use Miranda's Warp and Zaeed's Concussive Shot to bring down its barriers. When the armor is exposed, use Miranda's Warp and Zaeed's Inferno Grenade. Get as many shots at it as possible before it compromises your position. But once I realized it was after me and I got smart to keep moving, seeking cover and using my squad's powers, it wasn't as hard as the first few times I got killed. There's also a heavy weapons ammo crate on a small raised platform to the right as you entered the spaceport. Just be careful. To get to it, you expose yourself. Anyway, follow these tips and you'll bring down the Praetorian in no time.


No comments:
Post a Comment